
Planning Map Guidance for UK Applications
A planning officer should be able to understand your site’s orientation at a glance. That is the practical reason for learning how to add a north arrow to a planning map. It is a small feature, but it helps make your drawing clear, consistent and easier to assess alongside aerial imagery, neighbouring properties and other application documents.
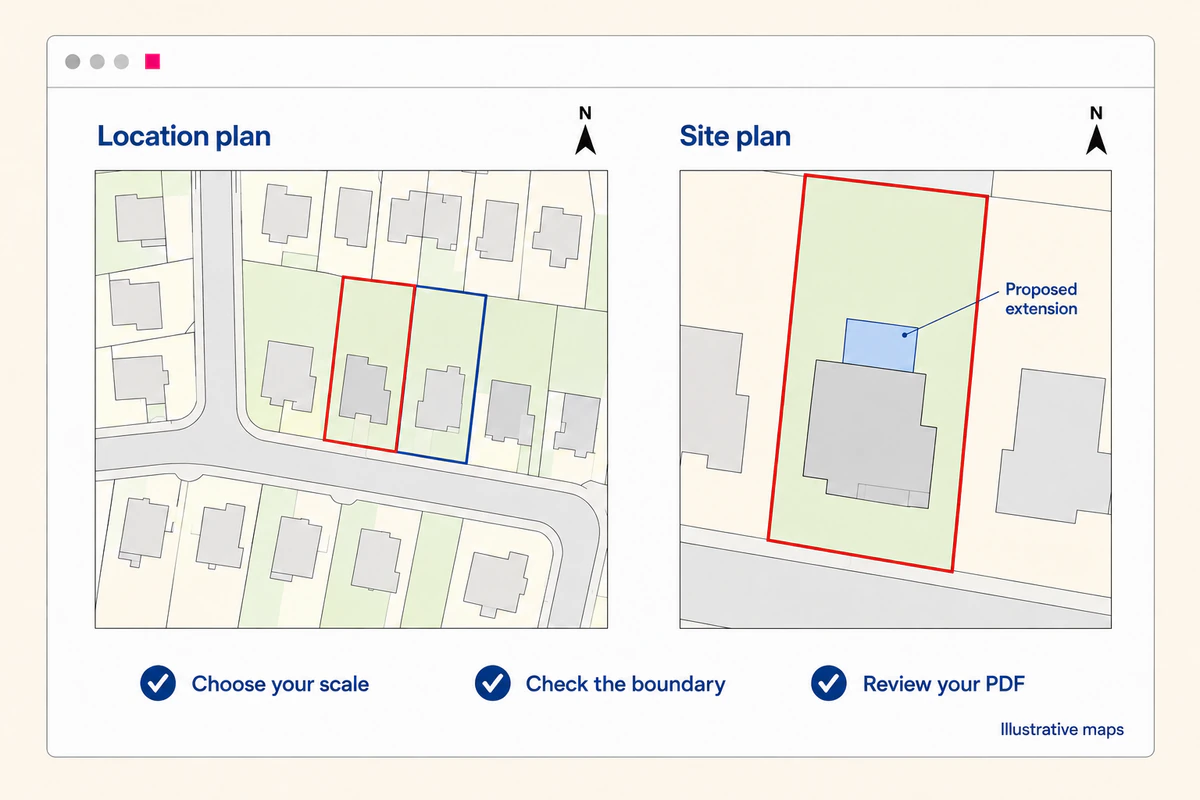
Getting your planning maps ready should be one of the simpler jobs on your application. The difficulty is knowing which plan to order, how much land to include and what the council expects to see. A few checks before you buy can save you having to prepare the same drawing twice.
Most applications need a location plan. Many also need a site plan, sometimes called a block plan. Floor plans and elevations do a different job: they show the building and its design, rather than locating the site.
Start with your council’s current validation checklist. Planning requirements vary across England, Wales, Scotland and Northern Ireland, and this planning map guidance is a starting point, not a replacement for that checklist.
Planning map guidance: choose the correct plan and scale
A location plan shows where the site sits in the surrounding area. It needs enough context for someone unfamiliar with the property to find it. Nearby roads, buildings and recognisable features all help.
In England, government guidance says location plans should use an identified standard metric scale, typically 1:1250 or 1:2500. The first often works well for a house in a town or village. The second shows a wider area and can be useful for larger or more isolated sites.
A site or block plan gives a closer view. UK Planning Maps offers 1:200 and 1:500 options, but check which your council requests. Do not treat either one as a universal default: the scale needs to suit the proposal and the local validation requirements.
Choose the scale around the information required, not simply the size of the house. You need the whole relevant site on the page, with the detail still readable.
What a location plan normally needs to show
The location plan should identify the application site clearly within its surroundings. Check that it includes:
- The complete application site, outlined in red
- Enough surrounding roads, buildings or land to locate it
- A north point and clearly stated scale
- Legible copyright and licence information
- A blue outline where required for other nearby or adjoining land you own
The blue line boundary does not show every neighbouring property. It identifies other relevant land in the applicant’s ownership, outside the red application boundary.
For an isolated plot, showing only a field and a short stretch of track may leave too much guesswork. Widen the coverage if necessary, using a scale and paper size the council accepts. A recognisable junction or neighbouring group of buildings can make the location much clearer.
What a site or block plan should show
The site plan explains how the development fits within the plot. Depending on the application, it may need to show existing buildings, the proposed development, boundaries, access, parking, paths, trees and neighbouring buildings. Relevant levels and landscaping may also be needed.
For an extension, the relationship between the proposed work, the existing house and the neighbouring boundary should be easy to understand. For a new home, the council may also need to see matters such as vehicle access, bin storage and outdoor space.
An important distinction: buying a base map does not produce a finished drawing of your proposal. You or your architect may still need to add the new building outline, dimensions and other application details. Check that work is included before treating the plan as ready to submit.
Mark boundaries accurately before you buy
Take a little time over the red line boundary. In England, it should include all land necessary to carry out the proposed development, including relevant access from the public highway, landscaping and parking. That may extend beyond the building itself.
Do not assume the red line should follow only the proposed extension, or automatically include every piece of land you own. The application site and the ownership boundary are not necessarily the same thing. If the correct extent is unclear, check with your planning adviser or council before drawing it.
Shared drives, side passages and separate strips of land deserve particular attention. Planning maps do not establish legal ownership. Where another person’s land is involved, ask about the appropriate ownership certificate and notices as well as the map boundary.
There is a useful reminder in a customer review featured on the UK Planning Maps homepage. Mr Wellden reported that his first map was missing the red outline and that the issue was resolved through online chat. Check your preview and downloaded file, and contact us if something is missing or looks wrong.
Make annotations clear, not crowded
A planning officer should be able to read the map without having to work around a collection of labels. Keep your red and blue outlines clear, but avoid making them so thick that they cover the detail underneath.
A short label such as “Proposed extension” or “New access” can be helpful on the appropriate drawing. Long explanations usually belong in the supporting documents. If a label overlaps a house number, road name or boundary, move it before saving.
Leave the north arrow, scale bar and copyright information visible. If you rotate a map, its north indication must still be correct. Cropping or enlarging a finished plan can also remove important information or change its printed scale, so use the supplied PDF and check any subsequent edits carefully.
Use a current, licensed map base
Use mapping that is current, clearly readable and licensed for the intended purpose. An old plan may no longer show a changed road layout or recent buildings. A screenshot from a general online map is not a substitute for checking the council’s drawing and licensing requirements.
UK Planning Maps supplies Ordnance Survey MasterMap-based location and site plans. The finished plans include a north arrow, scale bar and licence information, and the drawing tools let you add your boundaries. Once the order is complete, the PDF is available to download immediately.
You can find your map using a postcode. No postcode? Use Advanced Search to locate the land.
For a Northern Ireland application, check the appropriate mapping source, product coverage and local requirements separately. Do not assume that an Ordnance Survey product covering Great Britain also covers Northern Ireland. Your local planning authority is the right place to confirm what it needs.
Check the finished file before submission
Open the downloaded PDF itself, even if the preview looked right. This is the file you will upload, so give it a final check:
- Is it the correct property or parcel of land?
- Does the red outline include the complete application site?
- Is any blue outline accurate?
- Are the roads, labels and boundary lines readable?
- Are the north arrow, scale bar and licence details visible?
- Does the scale match the council’s request?
Compare it with the application form and other drawings. The site address, boundaries and access arrangements should agree throughout. An architect’s site layout showing a different entrance from the location plan is worth sorting out before submission.
If printing, use the stated paper size and print at 100% or actual size. “Fit to page” can alter the scale. Check the upload service’s current file-size limits too, and keep the original PDF safely in case you need another copy.
When a standard plan may not be enough
A standard map can provide the base for a straightforward application, but it cannot supply every piece of information a more complicated proposal needs. Sloping ground may call for a measured topographical survey. Trees, drainage, flood risk or highway access may require specialist drawings or reports.
Changing to a larger scale will not add measurements that were never surveyed. Ask your designer what information is needed before ordering extra mapping.
Finally, remember that validation and approval are different. Clear, correctly prepared plans help the council check whether an application is complete; they do not guarantee planning permission.
Ready to get started? Find your planning map, check the coverage and boundaries, then review the finished PDF before submitting it.
Ready to Get Your OS Plans?
Every plan is instantly downloadable, Planning Portal‑compliant, and includes all required elements. Get your plan now and submit your application with confidence.