
Blue Line Planning Application Boundary Explained
A blue line planning application boundary can look like a small detail on a map, but it helps a planning officer understand the wider landholding connected to your proposal. Draw it incorrectly, or leave it out when it is needed, and your application may be harder to validate or assess.
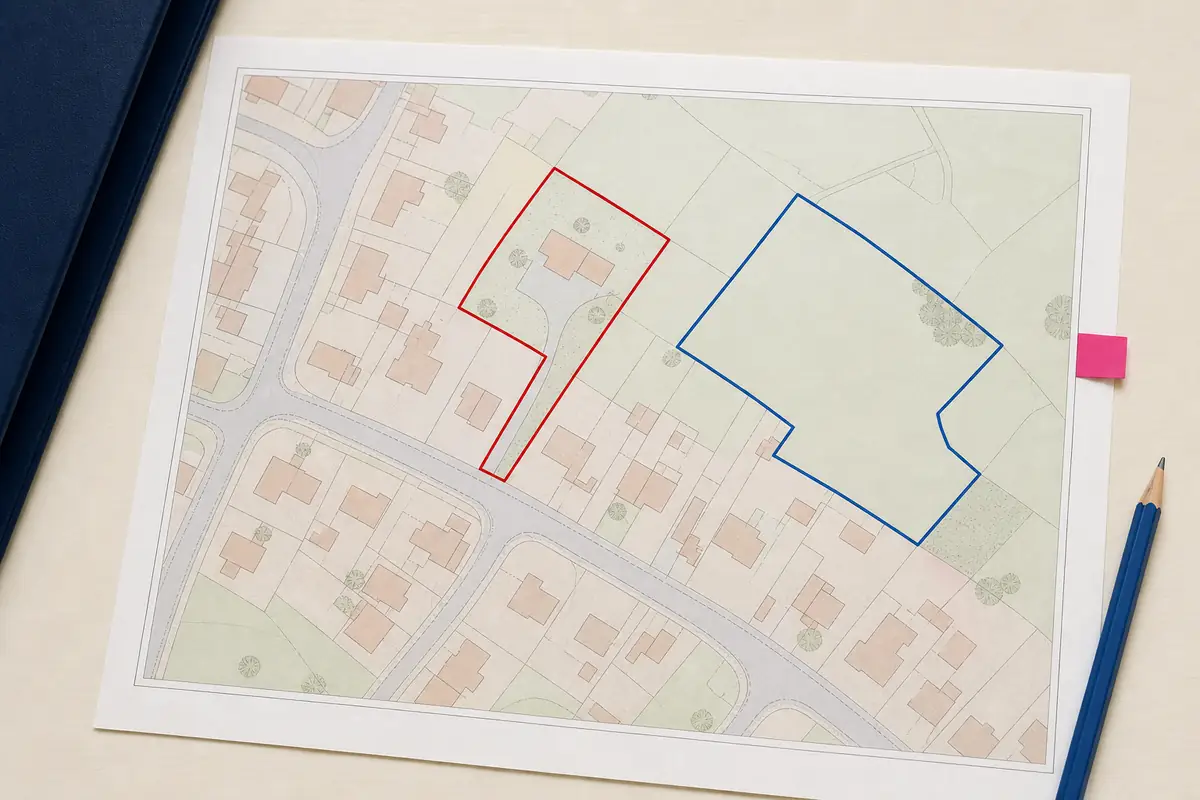
The red line on a planning map gets most of the attention, but it is not the only boundary you may need to show. If you own land close to the application site that is not part of the application, your location plan will normally need a blue line as well.
It sounds simple, but this is one of those small details that can cause confusion. Should the garden be red or blue? What happens if the access crosses another part of your land? Do you need a blue line when the application covers everything you own?
This guide explains what a blue line planning application boundary is, when to use one and what to check before you submit your plan.
What does a blue line mean on a planning application?
A blue line identifies other land owned by the applicant that is close to, or joins, the land covered by the planning application. It gives the local planning authority a clear picture of the applicant's wider land ownership around the site.
The blue line does not show the land where permission is being requested. That is the job of the red line. If you are applying to extend a house, for example, the red line would normally go around the application site, including the land needed to carry out the proposal and its access from the public highway. A separate piece of adjoining land that you also own, but which is not part of that application, may be outlined in blue.
The blue boundary is usually shown on the site location plan. This is the plan that places the application site in its wider setting, normally at 1:1250 or 1:2500 scale.
The difference between a red line and a blue line
The easiest way to remember the two colours is to think about the question each one answers.
- The red line answers: “Which land is this application about?”
- The blue line answers: “What other nearby land does the applicant own?”
The red line should contain the whole application site. That can be more than the footprint of a proposed extension or new building. It may include the house, garden, driveway, access route or any other land needed for the development.
The blue line is only for other nearby land in the applicant's ownership that sits outside that application site. It should not be used to mark neighbouring land owned by somebody else, and it is not a decorative second boundary around the red line.
Getting this distinction right matters. If land needed for access is coloured blue when it should be within the red boundary, the plan may not describe the application site properly. Equally, putting all land you own inside the red line can make the application site wider than the proposal requires.
When is a blue line planning application boundary needed?
You will normally need a blue line where you own other land close to or adjoining the application site and that land falls outside the red line.
Common examples include:
- A householder applying for work to one property while also owning the neighbouring plot
- A farmer applying for a building on part of a holding while retaining surrounding fields
- A landowner applying to develop one parcel within a larger area of land
- A property with a separate garage, paddock or strip of land under the same ownership
- An applicant who owns adjoining land on the other side of a lane or access track
The exact circumstances differ from site to site. Your council's validation checklist should be your first point of reference, particularly where ownership is split, the site is leasehold or the land is held by more than one person.
If you do not own any other land nearby, there may be nothing to outline in blue. Do not add a blue line simply because you think every location plan needs one.
Decide what belongs inside the red line first
Settle the red boundary before drawing in blue. Start with the land directly involved in the proposal, then include anything needed to build or use it. For a new home, that might mean its garden, parking and access as well as the building footprint.
Once the red line is right, look at the remaining land in the applicant's ownership. Relevant land close to or adjoining the site can then be outlined in blue. The blue line explains other ownership; it does not decide the limits of the application.
How to draw the blue line clearly
Use a continuous blue line that follows the outside edge of the other land as accurately as the map allows. Keep it visible, but avoid making it so thick that it covers buildings, paths or boundary features underneath.
For an irregular field or a long narrow strip, zoom in while drawing and add enough points to follow the shape. A line made from only a few large straight sections can cut across the wrong land. After closing the shape, zoom back out and check the complete outline.
It is also worth checking that:
- The blue line does not overlap the red line
- Every blue shape is complete, with no gaps at the corners
- The line surrounds only land in the applicant's ownership
- Important map detail remains readable beneath and around the line
- The finished PDF shows the same boundary you saw in the preview
If there are two separate nearby areas of other land, they may need separate blue outlines. The purpose is clarity, so the planning officer should not have to guess which land the colour refers to.
A planning map is not proof of a legal boundary
An Ordnance Survey feature is not, by itself, proof of a legal property boundary. Use your title documents, survey or professional advice when placing the lines rather than assuming every black map line shows ownership. If ownership or access is disputed, speak to a solicitor or surveyor before finalising the application.
Does the blue line go on a site plan too?
The ownership boundaries are most commonly dealt with on the location plan. A site plan or block plan has a different purpose: it gives a closer view of the site and shows the proposal in relation to buildings, boundaries, access, trees and other relevant features.
Your local authority may ask for boundaries or other ownership information on more than one drawing. Follow the wording in its validation checklist and keep the plans consistent with one another. If a red boundary appears in a different position from one drawing to the next, the case officer may need clarification.
Common blue-line mistakes to avoid
Do not outline the application site twice, use blue for a neighbour's land or leave gaps at corners. Avoid copying an old application without checking it, as ownership and the red-line site may have changed.
Open the downloaded PDF and inspect the boundaries at a normal viewing size. If printing, use 100% or “actual size” so the stated scale is preserved.
Check before you submit
Before uploading the plan, compare it with the application form, site address and your other drawings. The same land should be described throughout the application.
Check that the location plan also includes the basics: a recognised metric scale, a north point, enough surrounding roads or buildings to identify the site and correctly licensed mapping. The red line should cover the complete application site, while the blue line should be limited to other nearby land owned by the applicant.
If anything is uncertain, check with the local planning authority or the professional handling your application. A short question before submission is usually easier to deal with than a validation query afterwards.
Keep the plan simple and accurate
A blue line planning application boundary is there to make ownership around the site easier to understand. It does not need to be complicated. First mark the land included in the application in red. Then, where relevant, outline other nearby land owned by the applicant in blue.
Take a moment to inspect the shape, colour and position before ordering. With UK Planning Maps you can prepare a licensed planning map online and download the PDF when it is ready. If you are unsure about scales or file formats, the help page covers the most common questions.
Clear boundaries help the planning authority understand what is being proposed and where. That is the whole point of the red and blue lines: not extra decoration, but a straightforward picture of the application site and the land around it.
Ready to Get Your OS Plans?
Every plan is instantly downloadable, Planning Portal‑compliant, and includes all required elements. Get your plan now and submit your application with confidence.