
Location Plan vs Site Plan: What Planning Needs
A planning application can be delayed for a surprisingly simple reason: the map does not show the right information at the right scale. The location plan vs site plan question comes up often because both drawings identify a property, but they do very different jobs. Submitting one when the application requires the other can leave a planning officer unable to assess your proposal properly.
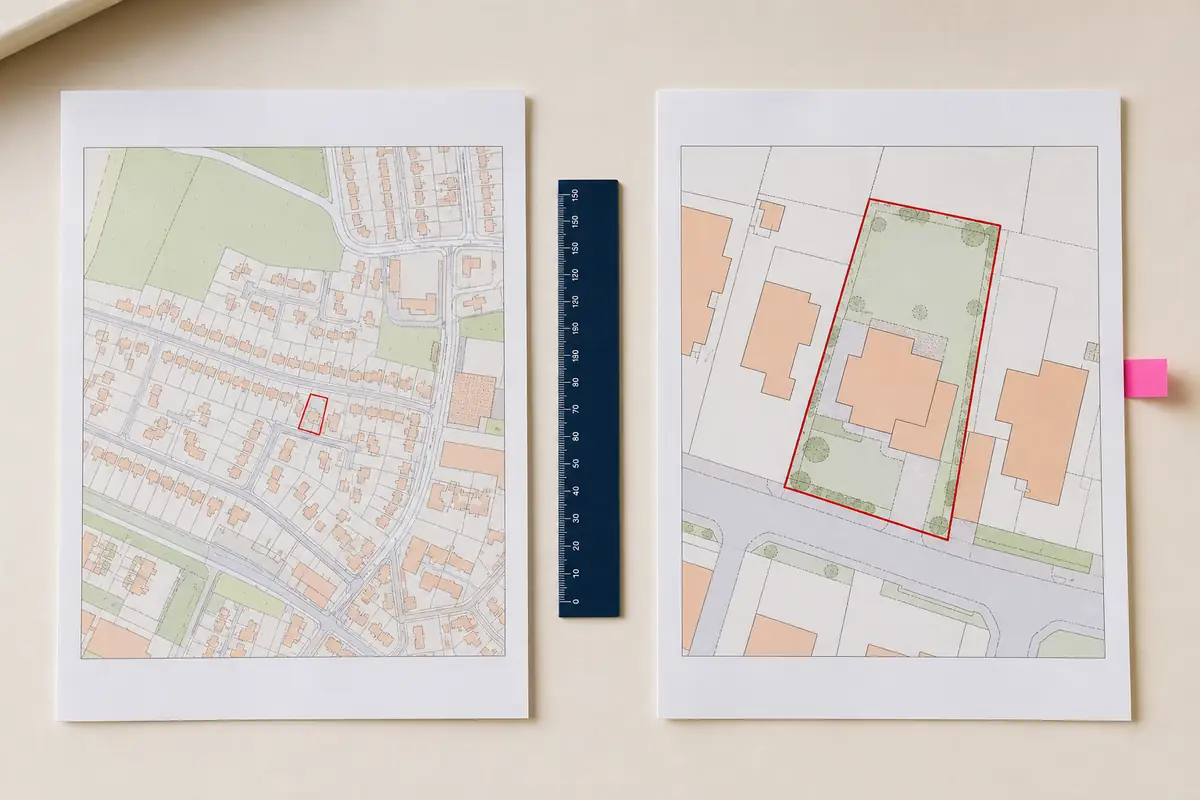
The names are similar, but a location plan and a site plan do different jobs. One helps the council find the application site. The other gives a closer view of the property and proposed work.
In many cases you will need both. Ordering only one because the names sounded interchangeable can mean another request from the council before your application is validated. Here is the practical difference, the usual scales and what to check before you submit anything.
Location plan vs site plan: the short answer
A location plan shows where the application site is in relation to the surrounding area. It is the wider view, normally at 1:1250 or 1:2500 scale. Roads, nearby buildings and other recognisable features give the planning officer enough context to identify the land.
A site plan, also called a block plan, is the closer view. It is normally at 1:200 or 1:500 scale and shows the development in relation to the site boundaries, existing buildings and other relevant features on or next to the property.
Put simply, the location plan answers “Where is it?” and the site plan helps answer “What is happening on the site?”
What a location plan is for
The main purpose of a site location plan is identification. Someone who does not know the property should be able to look at the map and find it from the surrounding roads, buildings and place names.
For most applications, a location plan should:
- Be drawn at an identified standard metric scale, commonly 1:1250 or 1:2500
- Show the direction of north
- Show enough adjoining roads or buildings to make the site easy to locate
- Show the application site edged clearly in red
- Show other nearby land owned by the applicant edged in blue where required
- Fit a standard paper size and remain readable when viewed or printed at the stated scale
- Use current, correctly licensed mapping
The red line should include the land needed to carry out the proposed development. That may include access from the public highway, rather than stopping at the building itself. If you own land close to the application site which is not part of the proposal, that is where the blue line may be needed.
A 1:1250 plan is often suitable for a house or a smaller site in a built-up area. A 1:2500 plan covers a wider area and is often more useful for a rural property or a larger parcel of land. The right choice is the one that shows the whole site and enough surrounding context without making the important detail too small.
What a site plan or block plan is for
A site plan or block plan brings you much closer to the property. It helps the council see how the proposal relates to the site, its boundaries and neighbouring land.
Depending on the work, it may need to show:
- Existing buildings and the proposed development
- The distances between the proposal and relevant boundaries
- Access arrangements, drives and parking
- Roads, footpaths and public rights of way
- Trees on the site or nearby where they could be affected
- Hard surfaces such as paths, patios or parking areas
- Walls, fences and other boundary treatments
Not every feature will matter to every application. A simple roof alteration will raise different questions from a new driveway, rear extension or detached outbuilding. The council's checklist should tell you what it expects for your type of proposal.
Site plans are commonly produced at 1:200 or 1:500. A 1:200 plan shows a smaller area in more detail, which can suit a compact site. A 1:500 plan gives more coverage and can make the relationship with neighbouring buildings easier to see. Whichever you use, the scale must be clearly stated.
Why the terminology gets muddled
“Location plan”, “site location plan”, “site plan” and “block plan” are not used consistently everywhere. A council may say “site plan”, an architect may say “block plan”, and an online form may use another version of the same term. That is why it is better to look at what the document must show rather than rely on the name alone.
Mr Crerand described this problem after creating both Site Block Plans and Site Location Plans. He found the process straightforward, but noted that terminology varied between the planning authority, the Planning Portal and map providers. Read the description beside each request: the wider map is the location plan; the detailed development-site map is the site or block plan.
Do you normally need both plans?
Many planning applications need a location plan and a site plan because the two maps provide different information. The location plan identifies the land; the site plan shows how the proposed work sits within it.
For a house extension, for example, the 1:1250 location plan may show the house in its street and the red boundary around the application site. The 1:500 site plan can then show the existing house, the extension, the garden, access and nearby boundaries in more detail.
For a driveway or dropped kerb, the location plan identifies the property while the site plan can show the frontage and access arrangement. For an outbuilding, the detailed plan can show where it will stand in relation to the house and the plot boundaries.
A change of use with no external building work may still need a location plan, but the supporting plans will depend on what the council needs to understand. Larger developments, listed buildings and sites with drainage, tree or access issues may require additional drawings or reports. A planning map is an important base document, but it is not a replacement for architectural drawings where those are needed.
The safest approach is to check the national requirements and your council's local validation list before ordering. The applications that require a site or block plan guide is also a useful starting point.
Choose the scale before you mark the boundary
It is tempting to draw the red line first and think about scale afterwards. In practice, it is easier to choose a map that comfortably contains the complete site and the necessary surroundings, then add the boundary.
For the location plan, check that the property can be identified without guesswork. Are the nearby roads or buildings visible? Is the whole red-line area on the page? For a rural site, would a wider 1:2500 view be clearer than squeezing the land into a 1:1250 plan?
For the site plan, check that the relevant buildings, boundaries and access are visible at a useful size. If the proposal is very small, 1:200 may offer the detail you need. If the site is larger, 1:500 may make more sense.
Common mix-ups to avoid
The first is submitting the same map twice under two different names. Enlarging a location plan does not necessarily turn it into a proper site plan, because the detailed plan may need proposed work and features that are not on the base map.
The second is outlining only the footprint of the new work in red. The red line identifies the application site and should include the land needed for the development, including access where relevant.
Another common problem is choosing a close scale that crops the site, or a wide scale that makes the property difficult to recognise. More coverage is not automatically better. The map needs to be clear for the job it is doing.
Finally, make sure the plans agree with one another. The red boundary, site address and position of the proposal should be consistent across the location plan, site plan, application form and design drawings. Small differences can create avoidable questions.
Check both plans before you submit
Open the finished files and look at them as a planning officer would. On the location plan, can you find the site quickly and follow the complete red boundary? On the site plan, can you understand the proposed work in relation to the building, access and boundaries?
Check the scale, north point, address or reference, licence details and page size. Print at 100% or actual size when a scale copy is required. Make sure no boundary covers a road name or other useful detail. If your designer needs to add proposed work digitally, CAD mapping files may be more useful than a finished PDF.
The difference between a location plan and a site plan is simple once you stop focusing on their similar names. One locates the site; the other explains it in detail. Choose each plan for its proper purpose, follow the local validation list and give both files a final check before uploading them.
Ready to Get Your OS Plans?
Every plan is instantly downloadable, Planning Portal‑compliant, and includes all required elements. Get your plan now and submit your application with confidence.