
1:200 Block Plan Requirements for UK Applications
A 1:200 block plan is often where a planning application becomes clear or falls short. Your drawings may show an excellent extension or new dwelling, but the planning officer also needs to see how the proposal sits within the plot: the building, access, neighboring land, parking, trees, and boundaries. If that context is missing or unclear, your application can be delayed while the local planning authority asks for revised plans.
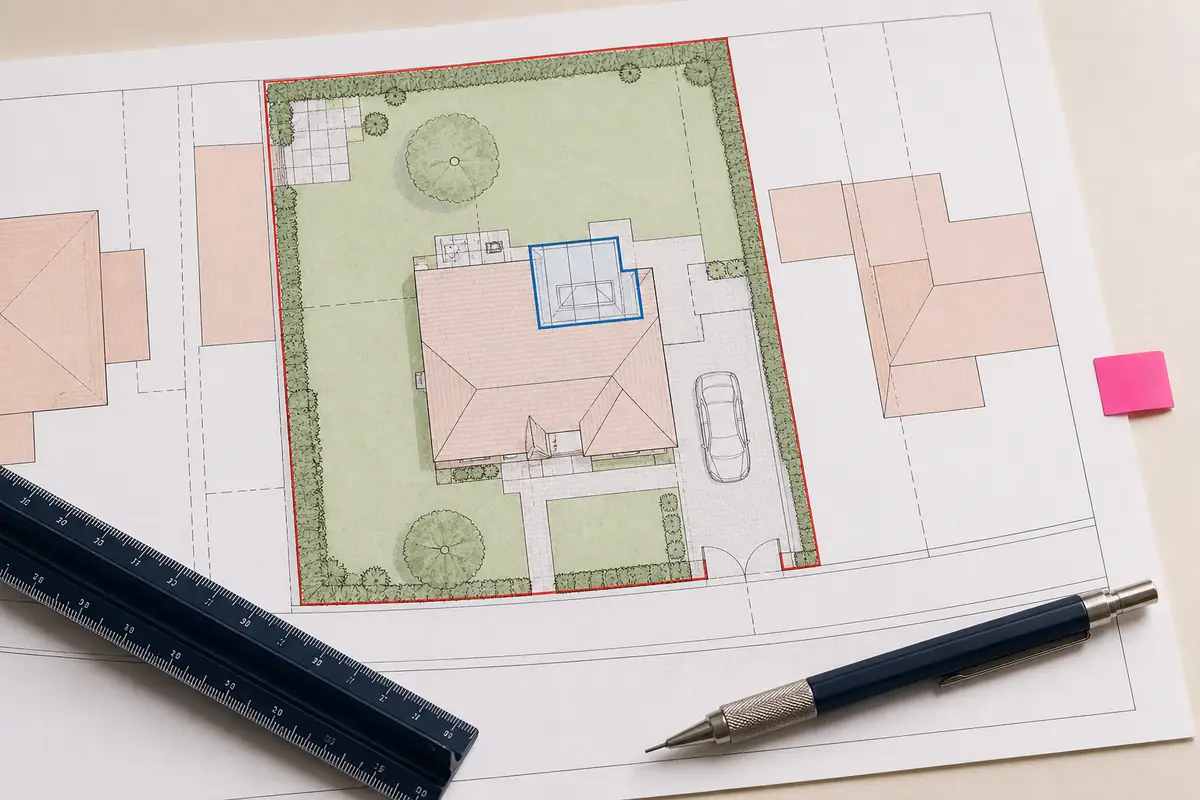
A 1:200 block plan gives the planning authority a close view of a development site. It often suits an extension, outbuilding or altered access where the position of the work needs to be clear against the property and its boundaries.
Choosing 1:200 is not the whole job, though. The plan also needs to show the right area, include the relevant site features and match the other drawings in the application.
This guide takes you through the usual 1:200 block plan requirements, the difference between a block plan and a location plan, and the checks worth making before you submit.
What is a 1:200 block plan?
A block plan is an overhead plan of the application site and its immediate surroundings. You may also see it called a site plan. It shows how the proposed work relates to the existing buildings, site boundaries, access and nearby features.
At 1:200 scale, one unit on the plan represents 200 of the same units on the ground. Put more simply, 1 centimetre on the printed plan represents 2 metres in real life. This close scale makes it easier to show the relationship between an extension and a boundary, or between a new garage and the house, than it would be on a wider location plan.
A 1:200 plan is still a scaled document. If it is reduced or enlarged when printed, measurements taken from it will no longer match the stated scale.
Block plan and location plan: what is the difference?
Most people encounter the two plans together, but they do different jobs.
A location plan normally uses a scale of 1:1250 or 1:2500. It shows the application site in its wider setting so the planning authority can identify it from surrounding roads, buildings and other recognisable features.
A site plan or block plan is more detailed and normally uses 1:200 or 1:500. It shows the proposed development within the site and its relationship with boundaries, neighbouring features and access.
Submitting a location plan when the council has asked for a block plan will not provide the close detail it needs. Equally, the block plan is usually too tightly focused to replace the wider location plan. Check the validation list for your type of application, as you may need both.
When is a 1:200 scale useful?
The 1:200 scale works well where the site is compact and the relationship between individual features matters. Common examples include:
- A rear, side or wraparound house extension
- A new garage, garden room or outbuilding
- Changes to a driveway, parking space or vehicle access
- A new wall, fence or gate where planning permission is required
- Alterations to a small commercial or mixed-use site
- A proposal close to a boundary, tree or neighbouring building
It can be especially useful when a 1:500 block plan makes the proposed work look too small on the page. At 1:200, there is more room to add clear dimensions and annotations without crowding the drawing.
That does not mean 1:200 is always better. A large property, long access or broad development site may not fit sensibly on the available paper. In that case, 1:500 may show the complete site more clearly.
What should a 1:200 block plan show?
The exact requirements depend on the proposal and the local authority. As a starting point, the plan should identify the scale, show north and cover the whole area relevant to the development.
It will normally need to show the proposed work in relation to the site boundaries and the other buildings on the land. Dimensions should make the important relationships clear, including distances from the proposal to the relevant boundaries.
Where they are affected by or relevant to the proposal, the plan may also need to show:
- Buildings, roads and footpaths on adjoining land
- Access arrangements, driveways and parking areas
- Public rights of way crossing or adjoining the site
- Trees on the site and on adjacent land
- Existing and proposed hard surfacing
- Walls, fences, gates or other boundary treatments
- The position and footprint of the proposed development
Do not add features merely to make the drawing look busy. Include what helps the planning officer understand the existing site, the change being proposed and its effect on the surroundings.
Existing and proposed information must be clear
A base map cannot describe a building that has not yet been constructed, so add the proposed work clearly. Some applications use separate existing and proposed plans; others use an outline or hatching with a key.
Keep the footprint and dimensions consistent with the floor plans and elevations. A block plan supplies site context, but it does not replace the architectural drawings that explain the design.
Choosing between 1:200 and 1:500
A 1:200 plan is more zoomed in and gives features more room on the page. A 1:500 plan covers more ground, which can help with a large house, long garden, several buildings or an extended access.
If the site is cut off at 1:200, move to 1:500 instead of using a cramped crop. If the proposal looks tiny at 1:500, use 1:200. Follow any scale stated by the local planning authority.
A customer example involving two scales
Sometimes more than one site-plan scale is useful. In a review of UK Planning Maps, Mr Stephens described ordering two site plans at different scales and appreciated having the option to amend the plans if needed.
That is a practical example of why scale is about the site, not a fixed rule. A close plan can show the immediate development clearly, while a wider one can give context for a larger area or access route. You should only order the plans your application requires, but it is worth checking the preview and speaking to somebody if the best coverage is not obvious.
Boundaries, access and nearby land
The site boundary and access must be easy to understand. On the location plan, the red line normally includes all land needed for the proposal and its route to the public highway; other nearby land owned by the applicant may need a blue outline.
On the block plan, show relevant boundaries, driveways, gates and rights of way. A mapped line is not proof of legal ownership, so use the proper documents or professional advice if the exact position matters.
Common reasons a block plan causes questions
The wrong scale, a missing north point, a cropped boundary or a missing proposal can all slow down validation.
Watch out for:
- The proposed development being too faint or not labelled
- Missing dimensions to buildings or boundaries
- Access, parking or hard surfacing left off where they are relevant
- Trees or rights of way omitted despite being affected
- Existing and proposed features using the same line style without a key
- A site plan that disagrees with the elevations or application description
- A PDF printed using “fit to page”, which changes the scale
Open the finished PDF and make sure labels, lines and dimensions remain readable.
A quick check before submission
Start with the council's current validation checklist. Confirm that 1:200 is accepted for the application and that the whole relevant area fits on the sheet.
Then check the plan itself. Is north shown? Is the scale stated? Can you distinguish existing and proposed work? Are the important boundaries, access points, neighbouring buildings and site features visible? Do the dimensions agree with the rest of the drawing set?
If you are printing, use the intended paper size and select 100% or “actual size”. If you are submitting online, upload the original PDF rather than a screenshot. The UK Planning Maps help page has further information about formats, scales and ordering.
Make the plan easy to understand
The purpose of a 1:200 block plan is not to fit as much information as possible onto one page. It is to give the planning officer a clear, measured view of the proposal within its site.
Use 1:200 when the site is compact enough for the scale and the extra detail helps explain the work. Move to 1:500 when you need broader coverage. Whichever scale you choose, include the features that matter, keep the proposal consistent with your other drawings and check the finished file before submitting it.
A straightforward plan is usually the strongest one. If the officer can quickly see what exists, what will change and how the proposal sits against the boundaries, the block plan is doing exactly what it should.
Ready to Get Your OS Plans?
Every plan is instantly downloadable, Planning Portal‑compliant, and includes all required elements. Get your plan now and submit your application with confidence.